
Monday, September 28, 2009
Sunday, September 27, 2009
two vegetarians. and bacon.
last night we threw a party at "elliott manor" to say a fond farewell to our lovely roommate, melinda, who has moved to the NE side of town. (i know what you are thinking but, no, i did not take her room! there were two rooms available when i moved in!) anyway, to my excitement (and everyone else, too), mikey made his famous whisky and carmel candied bacon ice cream! he made a whisky (!) based vanilla ice cream and then mixed a creamy carmel sauce into it with little bacon bits that had been candied with sugar...
it was delicious. very delicious. only in portland, folks. come and get it. (pictures to come.)
with the smell of bacon in the air, i had a feeling we were going to have a few vegetarians on our hands so i decided to make a couple vegetarian dishes and of course, another dish that contained, you guessed it, bacon. i went to the hollywood farmer's market in the morning and picked up some fresh veggies including beets, pears, shallots and gobo root.
GOBO.
i'm sorry. i'm really excited about this. it's been hard finding japanese vegetables, so when i saw it, i grabbed a ton of it and decided it was going to be one of my dishes for the night.
for all of you that have not heard of gobo or burdock, it's a woody root that's known for it's medicinal properties to help with digestion. basically, it has tons of fiber. i mostly know it from having to chop it up for long hours at a time (thanks mom!) to create the japanese dish called kinpira gobo. (i'm pretty sure my mom is laughing right now.) to much of my surprise, many people had not heard of gobo, so it was very exciting for me to make something from home for people to try. here goes:
mom's kinpira gobo:
serving size (giant bowl. or 10 people as a side dish)
4 gobo roots (about 18 inches long). peeled, cut on the diagonal, .2cm thick. then matchsticked*.
4 carrots, same as gobo
sesame seed oil
1/4 cup sugar
4-6 tblspn mirin (japanese sweet rice wine)
soy sauce, about 3-4 turns of the pan
dashi no moto**
ok, so the dish is really easy to cook. it's the prep that's the problem. in mom's version we don't peel the carrots or the gobo, just scrub it real good. for the sake of the newbies, i peeled everything this time.
*the "punishment" part is cutting the carrots and gobo on the diagonal and then matchsticking everything. basically, slice it thin but not paper thin. if you don't like chopping, i would suggest investing in a mandolin.
when the carrots and gobo are all prepped, heat your pan on medium high and pour in enough sesame seed oil to coat the bottom. when it's hot, throw it in and saute it so everything gets coated (not even 30 seconds). then sprinkle the sugar all around and keep sauting to incorportate (1 min). add the mirin. then add the soy sauce last. (must be in this order! if you ask, i'll tell you later why.) give it a taste. you may need to add more sugar or more soy sauce. that's it! ( i understand it's difficult to know what it's supposed to taste like if you have never had it. i'll make it for you first, i promise!)
**i normally throw in a few teaspoons of dashi right when i add the sugar, but since it's fish based, i kept it out for the vegetarians. if i put it in, it gives it more "umami."

next. i made a beet salad. most people don't know this but this was my first time cooking with beets. i didn't grow up with it, so there. i referred to my "cooking with jamie oliver" book for this one and adapted his beet salad recipe.
jane's first beet salad:
4 beets, peeled, and matchsticked (yay, for chopping!)
4 ripe but firm pears, matchsticked ( i used starkrimson pears because it was the favorite of the little girl that was selling them. i'm a sucker. what can i say?)
lots of mint from the backyard
8oz crumbles feta cheese
small handful of sunflower seeds
dressing:
juice from 2 lemons
2 tablespoons of honey
4 sprigs of thyme, leaves removed
1/4 to 1/2 cup of olive oil
salt and pepper
chop everything up, and throw it all in a big bowl that you won't worry about staining. for the dressing, combine the first 3 ingredients first and then whisk and add the olive oil last. add salt and pepper to taste. toss the salad with the dressing and that's it. i let it marinade in the fridge for a bit before serving. the main ingredients are jamie oliver's idea and the dressing i made up on my own! it was a great dish to celebrate beets!

last but not least, i made green beans and bacon. really easy, guys.
green beans and bacon:
1 pound of green beans, stems removed and cut in have (or in thirds if you like)
6 (or more) slices of bacon, cut into 1/2 inch pieces
2 shallots, thinly sliced
2 garlic cloves, minced
salt and pepper
heat pan to medium high and add a little oil to get it going. add bacon and brown. remove bacon from the pan and set aside. add green beans and saute in the bacon fat. after a few minutes add the shallots and garlic and saute till carmelized. add salt and pepper to taste. by the time the shallots/garlic have carmelized, the green beans should be sauted just to al dente (cooked but with a bite!). taste it. if it's good, then you're done!

the party was a success. beets were eaten. kinpira gobo was eaten. green beans were gone. the ice cream made you want to raise the roof.
oh yeah, i also made chocolate kahlua cake. but that one's a secret! sorry!
p.s. sorry about the photo quality. i didn't really take my time taking them so they're a little blurry.
Wednesday, September 23, 2009
grilled gorgonzola cheese and fig sandwich.
i went to the wednesday portland farmer's market in downtown this morning and picked up some fresh figs among a few other things. by the time i got home, i was starving. so, i pulled out some left over gorgonzola from the stuffed pork loin i made the other day decided to make a grilled cheese.
grilled gorgonzola cheese and fig sandwich:
1 fresh fig, sliced
a little red onion, sliced
crumbled gorgonzola cheese
sliced sourdough from grand central bakery
side salad:
mixed greens
sliced red onion
dressing-olive oil, balsamic vinegar, salt and pepper to taste
heat the pan up medium heat and throw some butter in (or you can spread the butter on the outside slice of bread if you like). sprinkle some cheese down, lay the slices of fig on top, then the red onion, then some more cheese. place the buttered (outside) slice bread on top, then flip when golden brown.
i served it with a side salad, oil and balsamic vinegar dressing. i especially like using balsamic in this case because we classsically think of figs and balsamic going together. i just like dipping the melty cheese/fig sandwich in the balsamic dressing that's floating around on the plate. yum.

Tuesday, September 22, 2009
coq au vin.
omg. that was damn delicious and well worth the time. i guess those french kind of know what they're doing...


i'd type out the directions, but it's way too long! i served it with some fresh rustic baguette from our local bakery and watched amelie to finish the french bistro night.
here's the recipe:
butchery trifecta.
as much as i hate being unemployed right now, it does give me time to cook. a lot.
some of you may know that last saturday i took a complementary butchery class offered to the public by my culinary school. they allow future students to get their knives wet without having to pay the ninety something dollars it costs to take the class.
it was awesome. even better, i got to take my killings home. two chickens, two beef sirloin steaks, and one pork loin. did i mention this was complimentary?
so, today i decided to attack a couple of the proteins before it all goes bad. (funny enough, i've been feeling a little anemic lately from all the veggies i've been eating here, so meat = good.)
chicken stock:
left over chicken bones, bits, pieces, etc. (i had two chicken carcasses)
2 carrot, rough chopped, unpeeled
3 celery stalks, rough chopped
1 onion, rough chopped
1 head of garlic, smashed, unpeeled
3 bay leaves
6 sprigs of fresh thyme
8-10 peppercorns
cold water
salt and pepper
i started the day by attacking the left over bones from the chickens i butchered and made a stock. now, mine were raw, but roasting in them in the oven is even better. i was feeling a little impatient already so i threw it in the pot. both methods are fine. basically, chop everything up in big chunks (it doesn't have to be pretty because it's all getting drained anyway), and throw everything (sprigs and all!) into a big pot filled with cold water that just covers the chicken by a couple of inches. set it to high, let it come to a boil and then turn it down to simmer for at least 3-4 hours. fat and other impurities will float up to the surface initially so make sure to skim it off (you can use a big spoon). add salt and pepper to taste when it's almost done. you'll probaby end up adding quite a bit of salt. strain it and discard the solids (or put it in your compost pile!). after you let it cool, you can freeze it if you want to save some for later!


coq au vin:
ok. now, for the actual chicken. (remember i've got a lot of time on my hands.) i decided to make coq au vin. not the quick version, but the really complicated classic french style (oui! oui!). it's still not finished in fact. for this, i am going to link you to the recipe on epicurious because it's just way too long and it's not my recipe. but for your enjoyment, i will at least explain the marinating process.
http://www.epicurious.com/recipes/food/views/Classic-Coq-au-Vin-107153
you will need:
1 chicken; 2 wings, 2 thighs, 2 breasts, 2 drumsticks (skin and all)
1 bottle of pinot noir or brandy (i used pinot)
1 large carrot, sliced
2 celery stalks,sliced
1 onion, sliced
3 cloves of garlic ( it says one but i love garlic so i used more)
peppercorns
oil
you'll have to wait till tomorrow to see how this turns out.
stuffed pork loin:
1 pork loin*
basil
gorgonzola cheese
pine nuts, toasted
1/4 cup crimini mushrooms, sliced
1/4 cup onion,diced
salt and pepper
* the pork loin needs to be cut in a way that you can roll it. the best way to do this is to place your hand on the top of the pork loin and then use a sharp knife and cut it lengthwise 1/3 of the way up from the bottom without piercing through the other side. now you should have pocket looking thing but with the top have larger than the bottom. now cut the top half in half from the inside of the fold without piercing through. it should lay thin and flat now. ( if you cut through on accident, it's fine.)
i realize i should have done a video for that last one. if i get my hands on another pork loin, i'll definitely video it!
now for the fun part. preheat oven to 450 F. saute the mushrooms and onions in some oil. put aside. place the basil on the opened piece of loin, then the mushroom mix on that, then cheese, then nut. roll the sucker up and tie it with some twine. i actually used thread because i couldn't find any. i did the fancy tie tecnique but you can simply cut 4 or 5, 6 inch pieces of string (depending on the size of the loin) and tie them around the stuffed loin so it doesn't fall apart when cooking. sprinkle salt and pepper on both sides and then throw it in the oven.
important note! you can either a) throw it into the hot oven for a few minutes (no longer) to get the outside nice and toasty and then turn it down to 350 for another 8-10 minutes so that it cooks evenly OR b) sear the outside of it in a hot pan to get some color on all the sides and then throw it in the oven for 8-10 min at 350F. it all depends on how big your pork loin is. mine fit into a frying pan so i chose option b. if it is a big one then you probably don't have a big enough pan and should choose option a. also. if it is big you will probably need more than 10 minutes (like 15-20).
anyway, a thermometer is your best bet to get it perfect. if you have one, make sure the internal temp gets to 140F. that means pull it off the heat around 5 degrees before. have a glass of wine and let it rest for 5-10 minutes and then cut into it! (don't forget to remove the strings!)


some of you may know that last saturday i took a complementary butchery class offered to the public by my culinary school. they allow future students to get their knives wet without having to pay the ninety something dollars it costs to take the class.
it was awesome. even better, i got to take my killings home. two chickens, two beef sirloin steaks, and one pork loin. did i mention this was complimentary?
so, today i decided to attack a couple of the proteins before it all goes bad. (funny enough, i've been feeling a little anemic lately from all the veggies i've been eating here, so meat = good.)
chicken stock:
left over chicken bones, bits, pieces, etc. (i had two chicken carcasses)
2 carrot, rough chopped, unpeeled
3 celery stalks, rough chopped
1 onion, rough chopped
1 head of garlic, smashed, unpeeled
3 bay leaves
6 sprigs of fresh thyme
8-10 peppercorns
cold water
salt and pepper
i started the day by attacking the left over bones from the chickens i butchered and made a stock. now, mine were raw, but roasting in them in the oven is even better. i was feeling a little impatient already so i threw it in the pot. both methods are fine. basically, chop everything up in big chunks (it doesn't have to be pretty because it's all getting drained anyway), and throw everything (sprigs and all!) into a big pot filled with cold water that just covers the chicken by a couple of inches. set it to high, let it come to a boil and then turn it down to simmer for at least 3-4 hours. fat and other impurities will float up to the surface initially so make sure to skim it off (you can use a big spoon). add salt and pepper to taste when it's almost done. you'll probaby end up adding quite a bit of salt. strain it and discard the solids (or put it in your compost pile!). after you let it cool, you can freeze it if you want to save some for later!


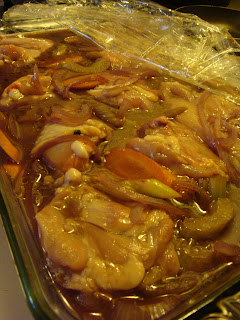
coq au vin:
ok. now, for the actual chicken. (remember i've got a lot of time on my hands.) i decided to make coq au vin. not the quick version, but the really complicated classic french style (oui! oui!). it's still not finished in fact. for this, i am going to link you to the recipe on epicurious because it's just way too long and it's not my recipe. but for your enjoyment, i will at least explain the marinating process.
http://www.epicurious.com/recipes/food/views/Classic-Coq-au-Vin-107153
you will need:
1 chicken; 2 wings, 2 thighs, 2 breasts, 2 drumsticks (skin and all)
1 bottle of pinot noir or brandy (i used pinot)
1 large carrot, sliced
2 celery stalks,sliced
1 onion, sliced
3 cloves of garlic ( it says one but i love garlic so i used more)
peppercorns
oil
so throw all the goodies (except chicken) in a pot and bring it up to a boil. when it comes up to a boil, turn it down to medium and let it simmer. it says 5 minutes, but i think the longer you let it simmer the better it tastes so i went with around 10 minutes (so rebelious!). once it cools, throw the chicken in and let it sit for a day or two in the fridge. here's what it currently looks like:

stuffed pork loin:
1 pork loin*
basil
gorgonzola cheese
pine nuts, toasted
1/4 cup crimini mushrooms, sliced
1/4 cup onion,diced
salt and pepper
* the pork loin needs to be cut in a way that you can roll it. the best way to do this is to place your hand on the top of the pork loin and then use a sharp knife and cut it lengthwise 1/3 of the way up from the bottom without piercing through the other side. now you should have pocket looking thing but with the top have larger than the bottom. now cut the top half in half from the inside of the fold without piercing through. it should lay thin and flat now. ( if you cut through on accident, it's fine.)
i realize i should have done a video for that last one. if i get my hands on another pork loin, i'll definitely video it!
now for the fun part. preheat oven to 450 F. saute the mushrooms and onions in some oil. put aside. place the basil on the opened piece of loin, then the mushroom mix on that, then cheese, then nut. roll the sucker up and tie it with some twine. i actually used thread because i couldn't find any. i did the fancy tie tecnique but you can simply cut 4 or 5, 6 inch pieces of string (depending on the size of the loin) and tie them around the stuffed loin so it doesn't fall apart when cooking. sprinkle salt and pepper on both sides and then throw it in the oven.
important note! you can either a) throw it into the hot oven for a few minutes (no longer) to get the outside nice and toasty and then turn it down to 350 for another 8-10 minutes so that it cooks evenly OR b) sear the outside of it in a hot pan to get some color on all the sides and then throw it in the oven for 8-10 min at 350F. it all depends on how big your pork loin is. mine fit into a frying pan so i chose option b. if it is a big one then you probably don't have a big enough pan and should choose option a. also. if it is big you will probably need more than 10 minutes (like 15-20).
anyway, a thermometer is your best bet to get it perfect. if you have one, make sure the internal temp gets to 140F. that means pull it off the heat around 5 degrees before. have a glass of wine and let it rest for 5-10 minutes and then cut into it! (don't forget to remove the strings!)


wow, that was a long entry. see how much you can get done in a day by playing hookie from work?
Friday, September 18, 2009
nomnom couscous.
It is such a wonderfully beautiful day outside that I decided to make something colorful for lunch! With a handful of farmer's market vegetables and feta cheese, you get a delicious vegetarian dish (this is for you Krista!).
nomnom couscoous:
serving size (4-6ish as a side or 2 for a meal)
2 green onions chopped
1/2 small red onion chopped
1/2 cucumber peeled and chopped
1 tomato chopped
1cup cous cous
2 cups of chicken broth/bouillon
handful of crumbled feta cheese
Boil around 2 cups of chicken broth or you can use the 1 cube of the Knorr Chicken Bouillon (what I use!).
When it is hot, add a cup of cous cous, turn off the heat and cover. Wait around 5 min or until all the liquid is soaked up. (If it is still liquidy, you can add more couscous). Use a fork to fluff the couscous. Add all your chopped veggies and feta, mix and enjoy! (I don't add any salt or pepper because the bouillon that I use already is seasoned.)
Note: I imagine chopped cilantro probably tastes pretty good in it too! (I didn't have any on me.)
I think I will eat the whole bowl myself.

Wednesday, September 16, 2009
food cart.
there has been some discussion...i think i want to start my own food cart, guys.
http://foodcartsportland.com/
http://foodcartsportland.com/
Monday, September 14, 2009
glorified tuna melt.
guess who made it to portland and found awesome (foodie!) roomates!?
i'm (semi) settled in now and living in a huge house in the south east side of portland nestled in the hawthorne district full of coffee shops, movie theatres, bars/pubs, vintage clothing and accessories and of course, FOOD. there are so many places to eat that i haven't had a chance to decide where to go first. so...
...i decided to warm up one of my roomates today by making him lunch a la glorified tuna melt. (i should also say that he caught ten giant albacore tuna so we have tuna galore in our house-thanks ben!). it actually started out as a glorified grilled cheese sandwich the day before but the added tuna definitely topped it off. i mean, who doesn't love a good tuna melt?
glorified tuna melt (certified oregon stlye):
2 slices of Grand Central Bakery bread
canned tuna freshly caught off the coast of oregon
1/2 cup fresh shredded mozzarella
1/4 cup red onion, sliced
1/4 cup mushrooms, sliced
3 slices of fresh tomato
butter, salt and pepper
aardvark hot sauce*
saute onions and mushrooms with a couple tablespoons of olive oil and add salt and pepper to taste. while this is cooking, butter the outside of the two slices of bread and preheat another pan on medium. when you are almost done cooking the vegetables, place a slice of bread (butter side down) into the preheated pan and place half the mozzarella on the bread. add the sauted vegetables straight from the pan onto the bread and cheese. top with tuna. top with tomato slices and top with the rest of the cheese. (* if you like hot sauce, now would be the time to put it in. i am a whimp when it comes to hot sauce and my roomates' goal is to change that. baby steps i say.) place the other piece of bread, butter side up on top. by this time, the bottom should be already golden brown. if it is, flip it over. press it down using a spatula so it all melts together. when both sides are golden brown, you are done!
serve with ice cold beverage (lagunitas IPA shown here) and enjoy!

and mom, don't worry. i also busted the sushi knife out and cut up the tuna sashimi style and we ate that as well!
Monday, September 7, 2009
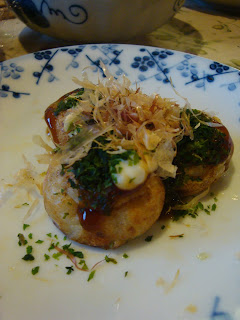
the last supper. takoyaki.
ah, yes, the infamous takoyaki party at the hashi house.
for my last supper at home before leaving tomorrow, we decided to eat the traditional osaka dinner of takoyaki. "what is this facinating thing called 'takoyaki,'" you ask?
octopus pancake balls. but in tonights case, we used squid because it was cheaper.
basically, you make a pancake like batter with a watery consistency and fill the half spherical hot plate or grill plate with it. add small pieces of tako or ika (squid) with a few garnishes and voila! you have your very own home-made takoyaki! we filled ours with ika, beni shoga (pickled ginger), tenkasu (tempura bits), and green onions. some even choose to fill them with cheese. but we won't go there.
after they have mostly cooked, you take a thin wooden skewer and flip em'. keep flippin' until you get a beautifully golden sphere. when they have cooked, top it with okomiyaki sauce (japanese style bbq sauce), mayo, katsuobushi (dried bonito flakes) and aonori (tiny dried seaweed flakes). grab some chopsticks and go to town.
warning: these babies are HOT! as much as you want to just pop em' in your mouth right after you get it all ready, they will burn! patience is key.
p.s. if you are wondering where to get your very own hotplate, i think you can get one at your local japanese market for around $60. this one came from japan. they also have grill plates that you can throw on the stove for much cheaper.


Saturday, September 5, 2009
summer corn salsa.
jimmy is having a bbq tonight so i have decided to make a summer corn salsa that simple to do but requires a bit of chopping. it's fresh, seasonal and you can practically eat it with a spoon.
there has been some requests that i put up some recipes as i go along. you'll have to bear with me as i don't normally measure anything out when i cook. when it comes to cooking, just taste it. you know what tastes good. here goes...
summer corn salsa:
3 ears of corn raw (or grilled if you have time), kernals removed
1/2 small red onion, chopped (small)
2 green onions, chopped (small)
4 avocados, chopped (chunks)
1lb cherry tomatoes, halved
small handful of cilantro, chopped
1 lemon
1 lime
salt and pepper
olive oil
basically, chop everything up. it doesn't have to be perfect. i usually chop/chunk the avocado last and then squeeze the lemon and lime juice right after so it doesn't get brown. add a few tablespoons of olive oil to combine it all and then add salt and pepper to taste.
remember, make this the way you like...if you want more corn, add more corn. if you despise cilantro, put a little in. i like garlic, so i used a bit of garlic salt along with regular table salt. you can throw in minced garlic if you want, but i'd rather not be the one to create a room full of smelly lifeguards.
if you need any advice or have any questions, let me know! i suck at writing recipes!
p.s. this is a pretty large serving of salsa that will probably feed at least 15 people (modest). if you want to make this at home and just want a small bowl, i would use 1/3 of the recipe.

Friday, September 4, 2009
.JPG)
.JPG)
.JPG)
.JPG)
.JPG)
.JPG)
Thursday, September 3, 2009
Intro.
Hello Friends!
As many of you may know, I'll be hanging up the "whereisjane" backpacking pack this fall to pursue my other great love: cooking. This by no means means that the "whereisjane" travels have ended, but a new chapter has begun. I've finally decided that I want to become a chef and will be attending the Oregon Culinary Institute in Portland, Oregon in October.
Some of you may be wondering where the moniker "whereisjane" originated. I began a videoblog called "whereisjane" on youtube around 3 years ago when I first started backpacking through Europe and then to South America. I filmed where I was, what I was eating, with a bit of history and perspective for those that weren't there with me. It gave my friends and family a way to see what I was seeing so that they may feel like they were part of the experience as well. Traveling had not only opened my eyes to different cultures but also experience how food shapes people's lives in different ways around the world.
I have decided to keep that user name to share my new adventures in the culinary world as I learn to cook my way through culinary school.
I hope you will enjoy it with me.
--Jane
Subscribe to:
Posts (Atom)